Update forms for separate task times
 The November 6, 2023 RB9 update included a couple of new features that require some setup on your part if you are going to use them. This article details our recommendations for updating forms that are affected by the new ability to schedule tasks at different times from their jobs.
If you schedule task times separately from job times update assignment forms
The 9.44 update lets you set start and end times for tasks that are different from their job times. Previously you could only do this by using the Linked Jobs feature. Now you can keep all related tasks in one job even if they have different time periods.
If you will use different times for tasks and their related jobs, you will need to update these forms to give resources accurate assignment information:
- Assignment Notifications
- Assignment Cancellations
Add new merge fields to email and PDF forms and make the information stand out with new formatting in the PDF forms.
1. Add necessary merge fields to correspondence
To share task times with resources you must add task start/end time merge data fields to email and PDF templates.
In the Assignment Notification and Assignment Cancellation System Preferences you can insert the task time merge data fields in:
- Email Subject
- Email Message
- SMS Subject
- SMS Message
- iCal Subject
- iCal Description
You do not have to insert the fields into every one of these options. Balance the information priority with the space restrictions of each option. For example, add the fields to every option above except the SMS and iCal Subjects to keep their subject lines short.
At a minimum you should insert task start/end time merge data fields in the Email Message for the two types of notices:
- Setup > System Preferences
- Click Calendar then click Assignment Cancellation.
- Click Edit.
- Click in the Email Message section where you want to insert the task start time.
- Click
 , then Task > StartTime.
 - Repeat steps 4 & 5 for EndTime.
- If you want to add task start/end times to any of the other sections, click in a section where you want to add the times and repeat step 5 & 6. When you have added time periods to all of the sections you want it to appear in click Save.
- Repeat for Assignment Notification.
2. Add new section to form templates
Before inserting task time period merge data fields into form templates we recommend adding a new “Task Time” section for the new Task Merge Fields on the Assignment Notifications/Cancellations templates.
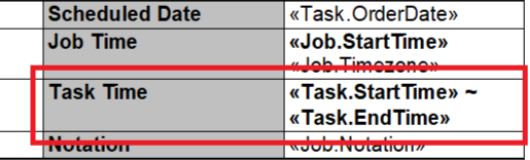
Recommended new section on Assignment form templates
- Tools > Form Templates
- Click Assignment Cancellation.
- Click
 > Edit next to the first template. Or click the template name then click Edit in the View Form screen.
 - If the form has a “Time” section, rename it “Job Time.”
- Click in the “Job Time” section or anywhere in the form where you want to insert task times.
- Click Table Tools above the form.
- Click Insert Below to add a row for task times below the insertion point.
- Enter Task Time as the header.
- Click in this new section where you want to insert task time data fields.
- Click Data Fields above the form.
- Click Insert Data Field then Task > StartTime.
- Repeat step 11 for EndTime.
- To style the new section click Home above the form and use the formatting tools. (For styling instructions see Editing form templates: Home options in the user guide.)
- Click Save.
- Repeat for Assignment Notification.
NOTE: If you have more than one version of Assignment Notification or Assignment Cancellation form templates be sure to insert the task time section and data fields into all versions that might include task times.
Listed under Best Practices, Communicating with resources, Customizing RB9, RB Lite, RB9 Tagged RB Lite, RB9, Send Assignment Notifications, Tasks