It’s your information — use it!
 You store so much information in your RB database such as extensive client contact details, historical data, even birthdays and anniversaries. And RB9 includes a lot of functions that give you access to your database in meaningful ways such as financial reports, job tracking, and collection tools.
Even with over 130 functions there is still a lot more information in RB9 that could be useful if you could compile it in ways that the current functions don’t provide. If you want to use your RB data in third party applications you can subscribe to the Data Reader plug-in. And you can always commission us to create custom reports but that can be expensive.
DIY reports
If your needs aren’t so complex or don’t require a 3rd party application, get to know RB9’s Query Maker tool. With it you can create your own RB9 reports that you can export to Excel or as comma separated values (CSV) files to import into other applications.
It might seem confusing — even intimidating — when you first look at Query Maker so following is a demonstration of how to use Query Maker to get even more out of your RB9.
Create client lists for your resources
If you have sales reps and/or resources who brought their own clients with them there is currently no way in RB9 to see a list of anyone’s clients. You can use Query Maker to generate client lists for each of your sales reps/Client Of resources.
In Query Maker you build queries that search your RB database and display only the information that matches the conditions you set up. Yo also set up what fields in your database are displayed in your query results.
Step-by-step setup
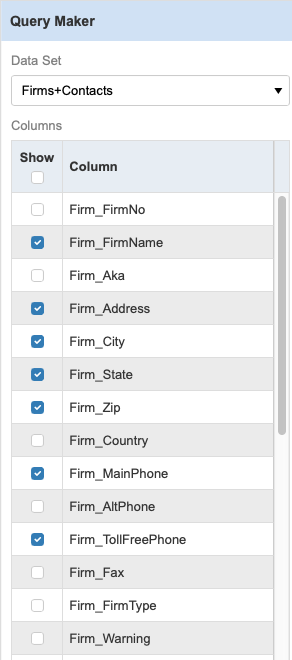 In Tools > Query Maker’s left panel, you choose which table(s) to search. For this example, we chose Firms+Contacts for the most complete client lists. (If you assign resources to firms only, you can select the Firms table. Similarly if you assign resources to individual contacts only, you can select the Contacts table.)
- In the same panel we select what information we want to display in the results. All fields are selected by default. For this query we deselected all (uncheck the Show box at the top) and selected address, phone, and email fields because we want our resources to contact their listed clients. Select other identifying and notes fields depending on how you will use the generated report.
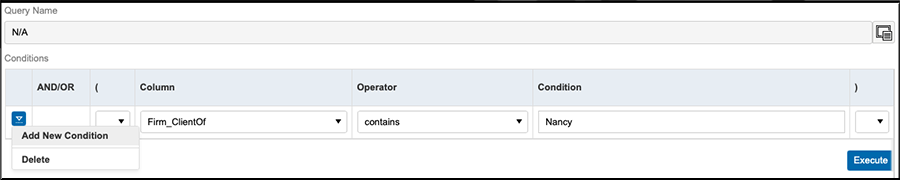
- You set your query conditions in the right panel. The first selection to make in our example is Firm_ClientOf or Firm_SalesRep in the Column drop-down. Selections in the drop-downs appear in the same order as the list in the left panel (which is roughly in order of how the fields appear in individual entities’ listings in RB9).
- We want to search by the resource’s name so you can select “Is Equal To” or “Contains” in the Operator drop-down. Then enter the resource’s full name for Is Equal To or their first/last/partial name for Contains.

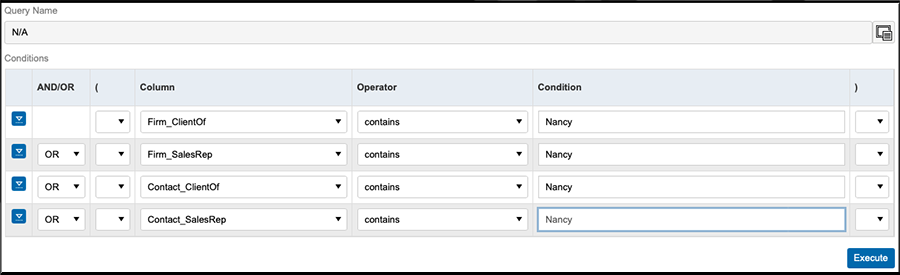
- If you only have sales reps or Client Of resources — but not both — assigned to firms, then you might only need that one condition to create your report. Click Execute and RB9 will display any relevant client listings under Result.
- If you have both types of resources assigned, click the blue down arrow button and select Add New Condition. Then select “OR” in the AND/OR drop-down because you want to find all of the clients for one resource whether the resource is entered in the clients’ Client Of OR Sales Rep field. Select the other type of resource in Column and repeat the same Operator and Condition.
- If you also have sales reps/Client Of resources assigned to individual contacts, click the blue down arrow button again and repeat the last step selecting Contact_ClientOf, then Contact_SalesRep under Column.
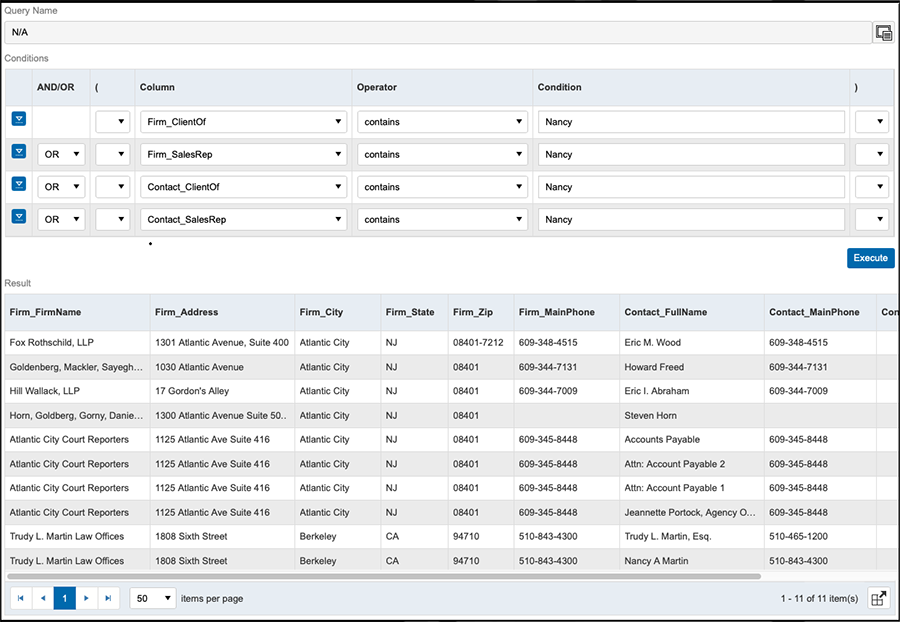
- After clicking Execute, check your results. Revise your query if needed. You can also shrink the width of any columns to save space. When you’re satisfied with the results, export them as Excel or CSV to save/share with your resource.
Save & repeat
Reuse your query for all of your sales reps & Client Of resources:
- Change the name in each Condition field in your query to the next resource you want a report for.
- Click Execute, then export the new report.
- Repeat for each of your relevant resources.
Save your query to reuse at a later time:
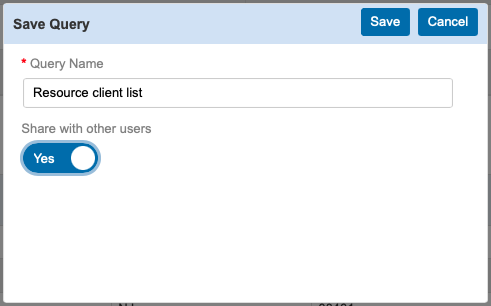
- Click Save at the top of the right panel.
- Name your query.
- Cick Save. The default is to save the query privately. If you want to share your query with others in your company, slide Share with others to Yes before saving.
This simple type of query that lists all results from one or multiple conditions might be enough for you to mine your RB database for useful information in different areas including cases, jobs, entities, invoices, payables, receivables, and tracking. You can do more advanced queries in Query Maker to find more targeted information when this basic type of query is not enough. But that’s a topic for a future article.
If you have any questions about Query Maker contact RB Support.
Listed under Customizing RB9, Increasing productivity, RB9 Tagged Query Maker, RB9, Tools